Installing and using ProtonVPN on desktop Linux

A VPN (Virtual private network) is an encrypted tunnel that extends over the public network. It allows users to browse and access resources securely over an Internet connection with extreme privacy and confidentiality.
[ You might also like: 13 Best VPN Services with Lifetime Subscription ]
ProtonVPN is a high-speed Swiss VPN that protects valuable information, such as passwords, through an encrypted tunnel. It offers significant features such as:
- Full disk encryption with ProtonVPN servers to help protect data from attacks.
- Strong VPN protocols such as KEv2 / IPSec and OpenVPN.
- Robust encryption with AES-256 for network encryption, 4096-bit RSA for key exchange, and HMAC SHA384 for message authentication.
- Encryption Encryption packages with complete confidentiality. This means that encrypted traffic cannot be intercepted and decrypted later if the encryption key is compromised.
- No log policy. Your information or Internet activity will not be tracked.
ProtonVPN offers numerous server locations, and as of this writing, it boasts over 1200 servers distributed 55 lands.
In this guide we will show you how to install ProtonVPN On Linux.
Register for a ProtoVPN account
The first step, above all, is to create a ProtonVPN account. You can do that by going to ProtonVPN official website and clickPricing-tab.
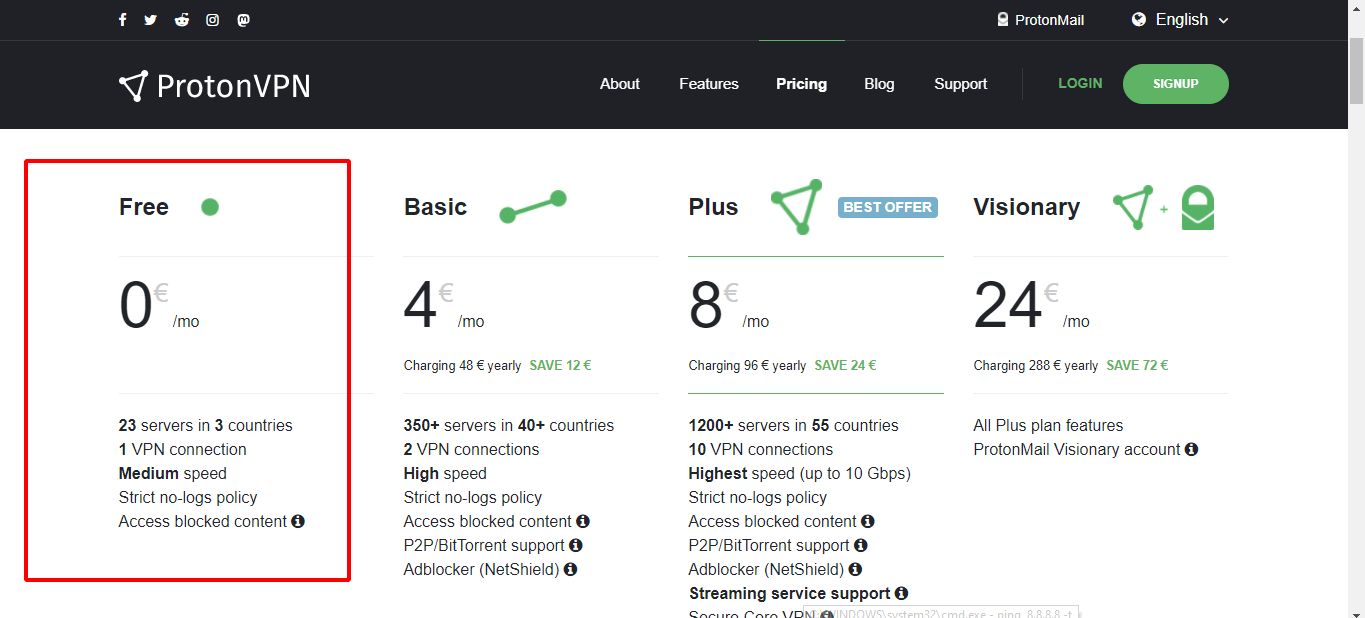
Proton VPN offers 4 pricing models, namely: Free, Basic. Plus and Seer. For demonstration purposes we useFreeA plan that allows you to test ProtonVPN for free for up to 7 days. With ‘FreePlan to have access to 23 servers divided into 3 countries.
So clickGET FREE‘-handleFreeoption.
This will take you to the Registration page, after which you will need to enter your information. An OTP will be sent to your email account to activate the account.

Once logged in, go to the left sidebar and clickAccountthen ‘OpenVPN / IKEv2 usernameoption. This looks like OpenVPN / IKEv2 username and password information.
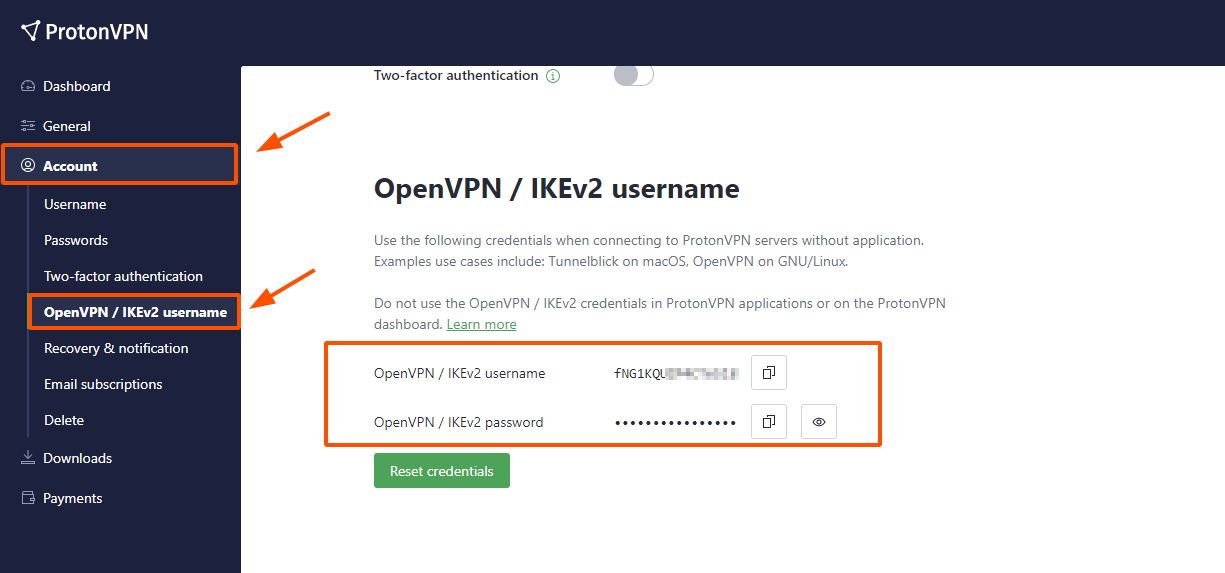
Copy and paste this information elsewhere, as you will need it later in this guide during the Proton VPN configuration.
Install ProtonVPN on Linux
With ProtonVPN already created account, the next step is to install ProtonVPN. VPN takes advantage IKEv2 / IPSec and OpenVPN protocol. OpenVPN the protocol supports both TCP and UDP and for this reason we use OpenVPN on the Linux desktop.
Install OpenVPN, run the following commands:
Install OpenVPN on Debian / Ubuntu
$ sudo apt update
$ sudo apt install openvpn dialog python3-pip python3-setuptools
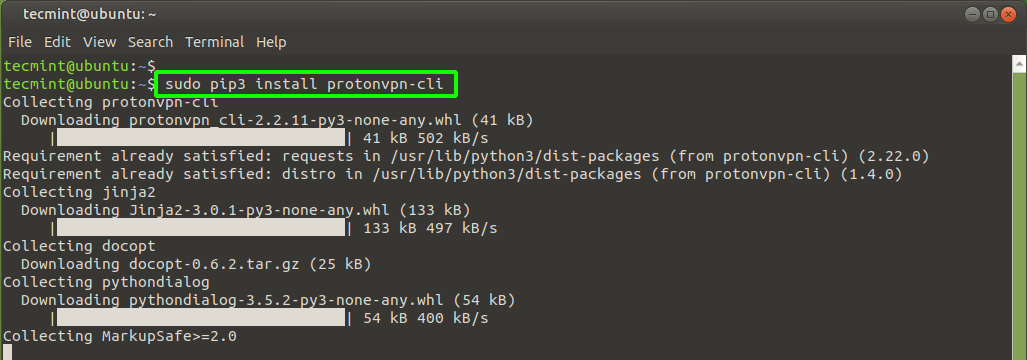
Then install ProtonVPN CLI using the pip packet manager.
$ sudo pip3 install protonvpn-cli
Install OpenVPN on RHEL / CentOS 8 and Rocky Linux
Red Hat derivatives such as RHEL / CentOS, Fedoraand Rocky Linux, execute the displayed commands.
$ sudo dnf install -y openvpn dialog python3-pip python3-setuptools
$ sudo pip3 install protonvpn-cli
Install OpenVPN on ArchLinux / Manjaro
Click Archive to run Arch-based distributions.
$ sudo pacman -S openvpn dialog python-pip python-setuptools
$ sudo pip3 install protonvpn-cli
Install ProtonVPN on Linux
When required OpenVPN packages are installed, the next step is to configure ProtonVPN On the Linux desktop.
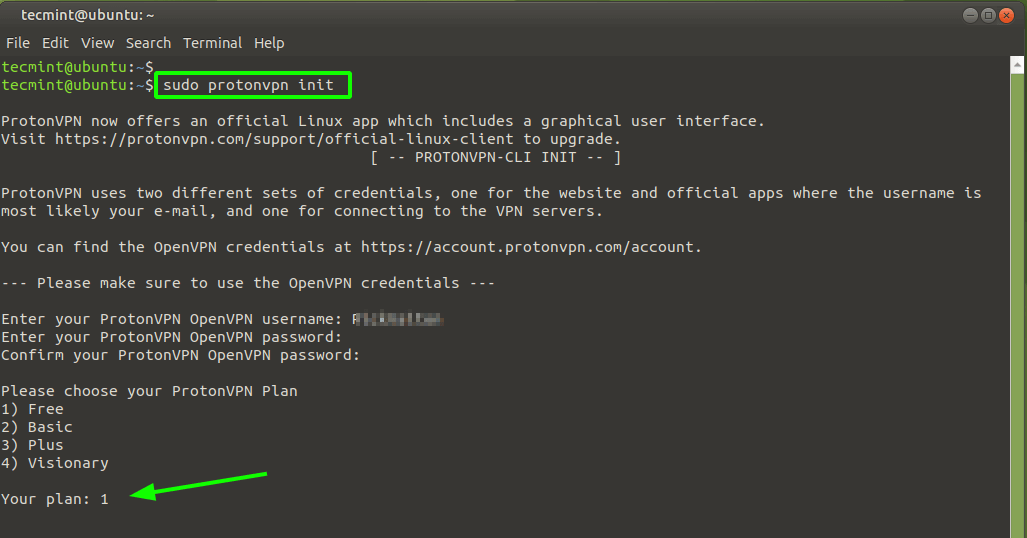
To do this, run the command below.
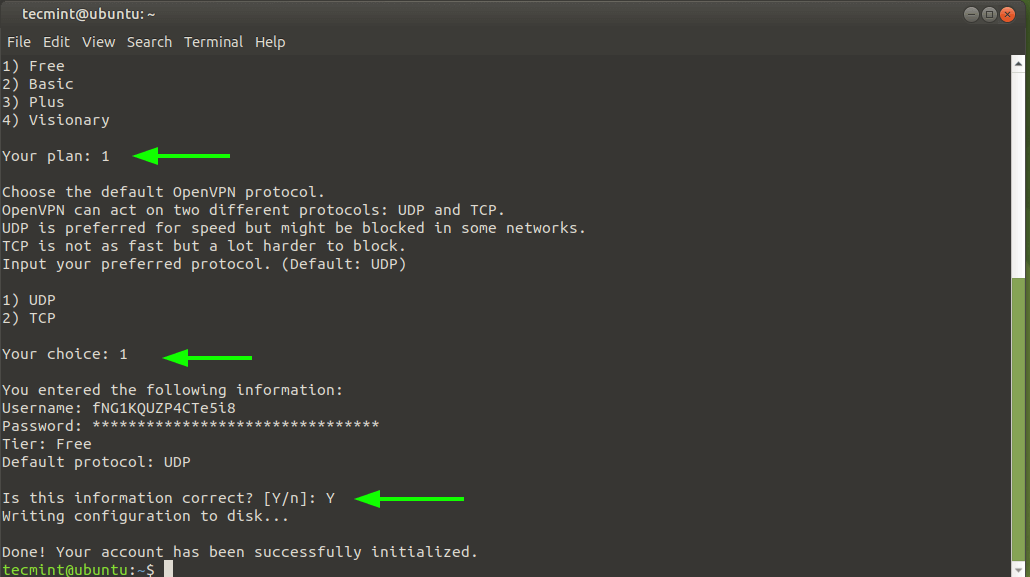
$ sudo protonvpn init
This will guide you through a few configuration steps. You must first enter your OpenVPN username and password. Remember the details we recommend copying and pasting into something? These are the details you need to provide.
Therefore, enter your username and password and confirm your password.
Next, write 1 choose a basic plan that is the plan we use.
Next, you need to choose either TCP or UDP protocol. Both work great, but for the sake of speed, we recommend you UDPand therefore write 1 and hit COME IN.
Finally, a summary of the selected configurations is displayed so you can review them. If everything looks good, hit ‘Y’ and press COME IN. Otherwise, press ‘n’ go back and start over.
Disable IPv6 on Linux
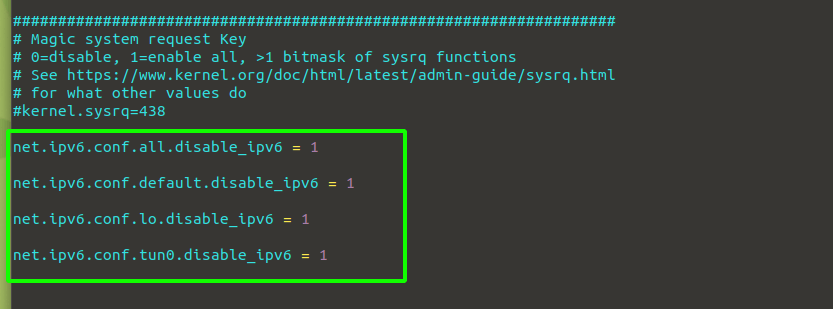
Because ProtonVPN the customer does not provide support for the item IPv6, best practice requires that we disable it to avoid IPv6 leaks. You can do it by opening /etc/sysctl.conf configuration file.
$ sudo vim /etc/sysctl.conf
Finally, paste the following lines
net.ipv6.conf.all.disable_ipv6 = 1
net.ipv6.conf.default.disable_ipv6 = 1
net.ipv6.conf.lo.disable_ipv6 = 1
net.ipv6.conf.tun0.disable_ipv6 = 1
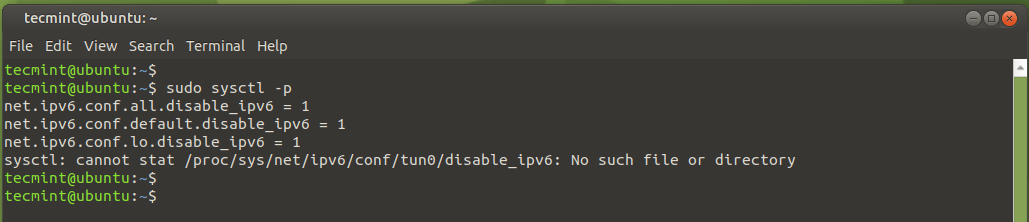
Save the changes and exit the settings file. Run the command to continue making changes:
$ sudo sysctl -p
Connect to ProtonVPN on Linux
We have completed most of the configurations. The only step left is to establish a secure connection to something ProtoVPN servers from the Linux desktop using the ProtonVPN client.
To connect, run the command:
$ sudo protonvpn connect
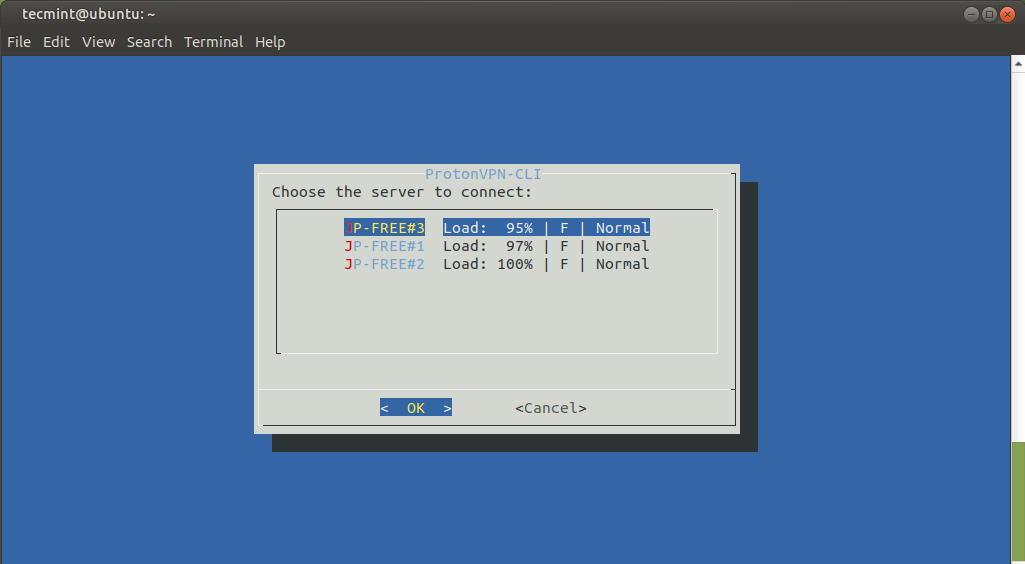
The free plan allows you to choose from three countries: Japan, the Netherlands and the United States. Any of these work just fine. Here. we have chosen Japan.

Next, select the server location in the country you selected.
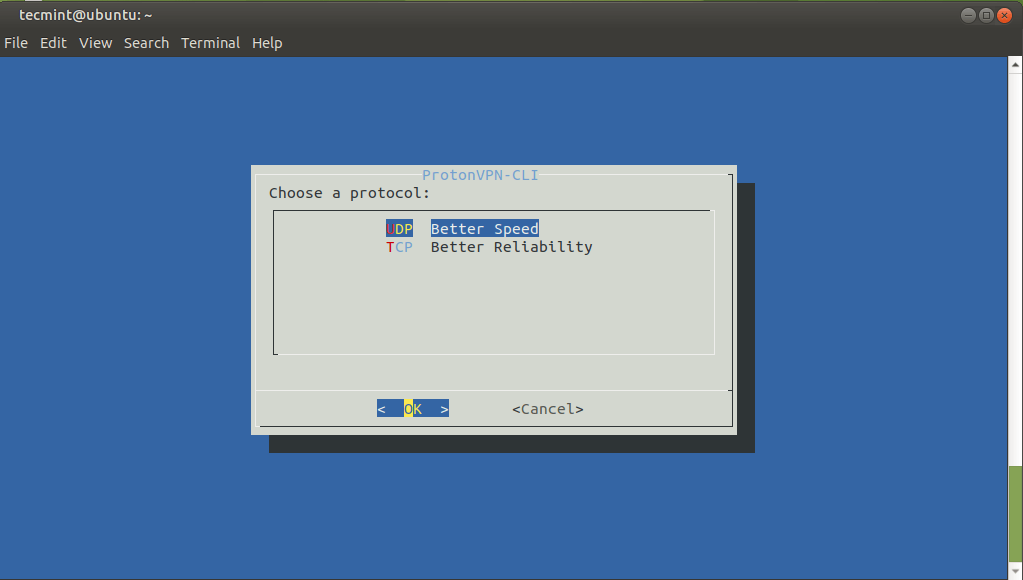
Next, you need to select a protocol. As before, select UDP for high speeds.
A few seconds later, a secure connection is established as shown. If you get an error, go back and reinstall ProtonVPN according to step 3.

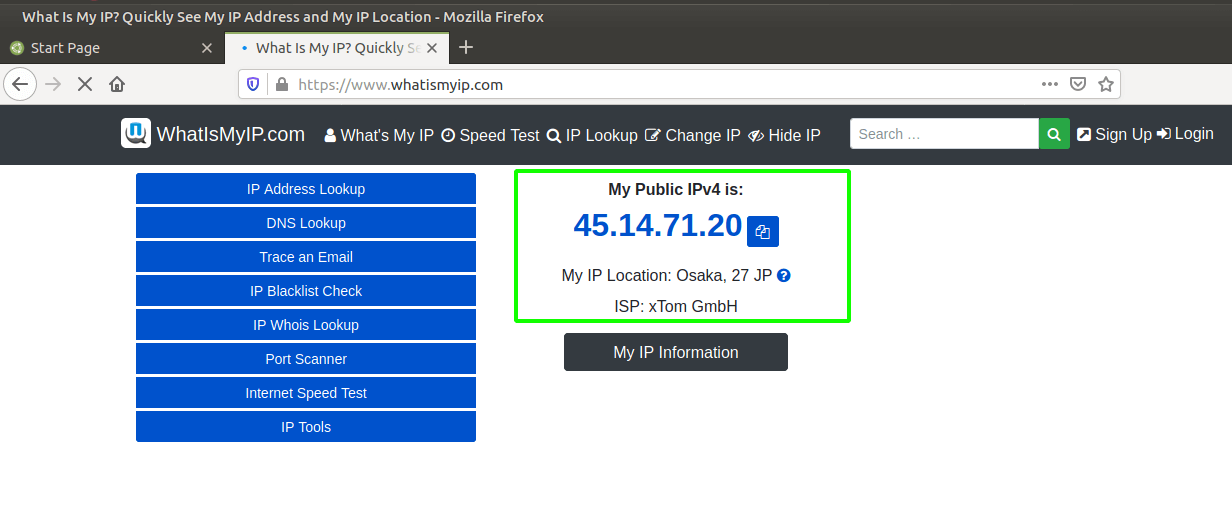
You can confirm the IP change from your web browser by visiting https://whatismyip.com. The result confirms that our location has changed to Osaka in Japan, which confirms that our determination was successful.
Disconnect from ProtonVPN
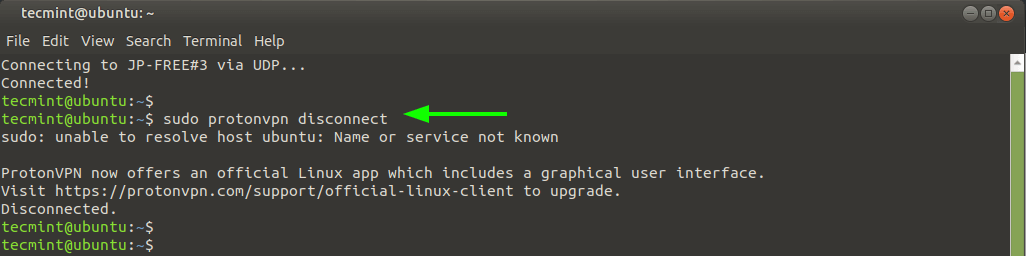
When you’re ready ProtonVPN service, you can disconnect with the command:
$ sudo protonvpn disconnect
And this makes today our guide on how to install and use Proton VPN on Linux.
If you appreciate what we do here at TecMint, you need to consider:
TecMint is the fastest growing and most trusted community site for all kinds of Linux articles, guides, and books online. Millions of people visit TecMint! Search or browse thousands of published articles that are accessible to everyone.


Comments
Post a Comment